Frequently Asked Questions
- Can I use a scythe on a thick stand of blackberries?
- How often do I peen the blade?
- I have a peening jig but cannot reproduce the sharp edge the blade had when new. What can I do to duplicate the original edge?
- The whetstone that came with my outfit is very rough on the wide faces. Won’t that make it difficult to hone the blade?
- Your assembly instructions say to dry fit the handles to find a comfortable position. I have never used a scythe before so how do I know what angle is comfortable?
- How do I replace handles and stem on one of your snaths?
- How do I set the handles on an American style scythe?
- Will you blades fit on an American style snath?
- Can I peen my American pattern blade?
- How do I sharpen the blade on my American Style Scythe?
- Can the scythe be used on a slope?
- My scythe bogs down in heavy grass. What can I do?
- Why does most of what I try to cut just bend over and pass under the blade.
- Aren't all scythes the same?
- What about having to keep the scythe sharp?
- Can I use a scythe on a thick stand of blackberries?
I use a bush scythe to clear blackberries, brush and young saplings along field edges around here. For your application I would recommend the 16" Styria bush blade. It will cut the green blackberry stalks easily but you will need to use caution with the stalks you describe as "dry and woody". In that condition the stalks can be very hard and tough but the blade will cut them. The trick is to go slow to learn the best method of cutting them. It is possible to damage a blade, or less likely, break the snath, when mowing thick, dry stuff. Certainly you will need to sharpen with a stone fairly often. You will hear and feel the blade getting dull. A few (8 or 10) strokes with the stone generally puts the keenness back on the edge. When you spend more time stoning than mowing it's time to peen the blade again. Please refer to our website articles about bush scythes at
http://scythesupply.com/bushscytheinstructions.html
http://scythesupply.com/bush-scythe-in-woodlot.html
- How often do I peen the blade?
 Depends. Nothing like equivocation, eh? It does depend on how often the blade is used, how hard (or easy), the kind of material mown: clover is easy, grass with last year’s dried grass under it is as rough on a blade as running it through sand. You might peen after 2 or 3 hours of use or the edge may last longer. As you mow it is advantageous to stop every 5 to 10 minutes to hone the blade with your whetstone. (http://scythesupply.com/honingworkshop.html ). Each time you hone the blade the stone erodes away the fine, thin edge created by peening. Eventually, the edge becomes blunt The blade will feel sharp but that keenness will not last very long before whetting is needed again. If you spend as much, or more, time honing the blade than mowing, the blade needs to be peened.
- I have a peening jig but cannot reproduce the sharp edge the blade had when new. What can I do to duplicate the original edge?
There could be several reasons why you cannot reproduce the original edge. A stone with a coarser grit might help. I would recommend our "Turkenwetzstein" synthetic, medium coarse stone # 7027 @ $8.00. You would use it to set the bevel on a just peened edge then finish hone the edge with the Dragon stone (the stone that came with your outfit). The TW should be used lightly and sparingly as it removes a great deal of steel with each pass which wastes away the peened edge. The Dragon stone with it's lighter grit takes longer to hone an edge but it leaves the peened area intact for a longer period. Another possibility is that you are not holding the blade correctly on the jig. The underside of the blade must lie flat against the anvil of the peening jig. The edge held lightly against the center guide post. Please review the Chapter in The Scythe Book on the peening jig that begins on page 142. It takes some studying but there is a great deal of excellent instruction there. The big downside of using a peening jig is that resting the edge, however lightly, against the post dulls the edge as the cap pushes the steel against the post. It takes a lot of stoning to replace that flat face with a properly beveled edge. Hammer blows should be hard enough that the caps leave a noticeable impression on the edge. Please see our workshop on peening @ http://scythesupply.com/peeningworkshop.html Also, refer to the "Tips and Tricks" instructional sheets that came with you outfit for other details about peening. Use the #1 cap followed by the #2. The #1 cap leaves the edge U-shaped like the gutters at the eaves of a house. The #2 cap leaves the edge tapering back from the edge to the web. Exam the underside of the caps to see the shapes each cap impresses into the blade's edge. That will give you an idea of how the edge should look when finished with each cap. Keep the bottom of the blade flat on the anvil. When it is flat the hammer blows have a solid sound of steel on steel (hammer, cap, blade, anvil). Tip the rib up or down and the sound is hollow. Tip the toe or heel up and the sound is tinny. Listen for that solid "Thunk" when you strike the cap then you know the blade is flat. Since the blade is curved in several dimensions keeping the blade flat calls for constant readjustment as you peen the length of the blade. Mount the jig in a log (see on line workshop). When the blade sits on the jig it should also rest on across your legs as pictured. That way you can use slight movements of your leg muscles to keep the blade positioned correctly. Another thing that leads to difficulty in peening is moving the blade too quickly or too slowly under the jig. Each time you strike a cap move the blade about 1/16" to the left (to the right if you are left handed) and strike again. Repeat this down the length of the blade from beard to toe. The 1/16" per tap works out to be 16 to 20 taps per inch of blade. You can use that information to set up the rhythm. Make lines with a marker at one inch intervals along the length of the blade. Then as you peen count the number of hammer taps between the marks to get the rhythm down. Use a hammer that has a flat face and a weight between 16 and 20 ounces (16 oz is best). Scythe Supply has produced 30 min DVD demonstrating use of a jig, anvils, stoning and repairs.
back to top- The whetstone that came with my outfit is very rough on the wide faces. Won’t that make it difficult to hone the blade?
Rough on both wide faces is normal. The Dragon stone is quarried and the wide faces are not usually ground smooth. When you use the stone on the scythe use the smooth, narrow, curved faces to hone the edge. (Sometimes one wide face comes smooth and it's handy for sharpening your pocket knife and such.)
Place one end of the stone on the back rib and lay the other end on the cutting edge to get the right angle to bevel the edge. You can get an idea of what I mean if you look on page 147 of "The Scythe Book", Fig 7. There's another good drawing on page 152, Fig 9.
Start at the beard then stroke the stone down toward the edge. At the same time slide it 4 – 6 inches toward the toe. Overlap the strokes as you go down the edge to the toe. When you've done the front side turn the blade over and lightly stone against the edge to remove the burr.
When your mowing in the field you wig-wag the stone down the edge beard to toe, front then back. You can see an animation on our website.
http://scythesupply.com/honingworkshop.html
You probably don't want to go so fast. Slow and easy saves fingers. Try to duplicate the angle of the stone as if it were lying on the rib and the edge.
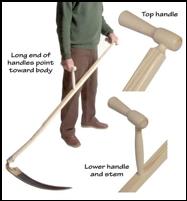
back to top- Your assembly instructions say to dry fit the handles to find a comfortable position. I have never used a scythe before so how do I know what angle is comfortable?
Please take a look at our web page http://scythesupply.com/snath-assembly.html. There is a photo there of a man holding as scythe which may help with the following explanation.
When you first put the handles on the snath set them so they are 90 degrees to the snath with the ends pointing towards you as shown in the photo. Lightly tap the handles into position. The lower handle stem and holes are tapered so they will fit tight but can be removed later. The upper handle fits on the tenon tightly but you will be able to move it, perhaps with the light taps of a hammer.
Mount the blade on the snath. Now, hold the assembled scythe as in the photo. Try a few practice swings in a flat, open space or better still mow some grass. The handles will be tight enough without glue that you can mow for a while. If not, try tapping them into place with stronger blows. The handles should be loose enough so you can rotate them if necessary to find the "comfortable angles".
You may find that 90 degrees is just fine. Some folks like to mow with one or both handles rotated slightly either side of the 90 deg position (up or down for the upper handle, right or left for the lower handle). Others like to mow with both handles 90 deg facing away from them, some with one handle facing them the other facing away. It is a matter of preference. It sounds more complicated than it is. Try playing around until you are satisfied.
Once you have located the handles in a comfortable position use a pencil to mark the positions of the handles in relation to the snath. Disassemble the handles, apply glue, reinsert the handles and stem, line up the marks and tap everything together, just tight enough to make the joints seat. Let the glue set up per the manufacturer's directions.
- I need to replace the stem and lower handle. Do you provide spares and how do I replace them?
 We do sell replacement handles and stems. Please see our order form.
Handles or the stem seldom break though sometimes folks in their enthusiasm to get mowing glue one or both of the handles facing the wrong direction. Generally handles are mounted with the long end facing the mower as shown in this image. This is not always true in every case which is why we recommend dry fitting the handles before gluing to find the most comfortable and convenient position.
Replacing the stem for the lower handle.
If the glue has not set tight gently rotate the handle back and forth to free the parts. This sometimes works on old glue joints that have weakened. This is the least complicated way of separating the parts. Once apart clean up the hole in the snath with a piece of sand paper rolled up like a scroll. Do not become too aggressive. The idea is to remove the residual glue not enlarge the hole. The hole is tapered so you may have to roll the sandpaper up like a cone to do a good job. A round rasp works well to remove this last bit of wood. It’s important to remove as much of the old glue as possible from each mating piece so the new glue will bond to clean, porous wood.
If the stem has broken then grip the stub end with a pair of pliers and twist gently. This may free up the joint. If not, you will need to saw the stub end of the stem flush with the snath then turn the snath over and drill out the stem.
The stem and its hole are 3/4" diameter and cut on a standard Morse taper. The chances are slim you have access to a ¾” Morse taper drill. The following directions describe how to replace the stem using regular tools. If you plan on drilling out the stem from the snath be sure to drill from the bottom as it is the smallest diameter of the taper. Find a drill that slightly smaller than 3/4". Mount the snath so you can drill accurately. There should be a center mark on the end of the stem. Use this depression to start the drill. Make pencil lines on each side of the snath parallel to the run of the hole. These will help guide you as you push the drill. If you have access to a drill press the angle of the hole is approximately 31 degrees. You can take the angle accurately with a bevel or measurements before cutting the old stem off flush with the snath then use the take-off to set up the drill press or a jig. Drill the hole undersize and you can punch out and/or sand the remainder of the wood so the new stem fits correctly.
Install the new stem and handle using the directions in the assembly instructions.
Upper and lower handles and stem are available from Scythe Supply. Handles come the holes installed unless you request otherwise..
Removing and replacing the top handle.
If the glue hasn’t set hard or the joint is weak the handle may come loose by gently moving it back and forth around the tenon. Be careful that the tenon does not twist. You do not want the tenon to snap off.
Should that not work then saw off the ends of the handle as close to the tenon as you can without cutting the tenon. Use the finest tooth saw you have available. Use wood chisel to pare off the remaining handle wood. Another option is to use a power sander or a flat wood rasp. Smooth up the tenon with sandpaper to remove any dry glue. Install the new handle following the directions in the assembly instructions.
Here is an admonition. Often the stem is broken because the user swings the scythe too hard; with too much force. Mowing with a scythe truly is a gentle art. It does not require great strength or a lot of force. The trick is to use your leg muscles and not your upper body strength to power the scythe as you swing the sharp blade through the grass in a slicing arc. See our workshop on The Stroke for details. Our VHS video “Maintaining and Using the European Scythe” has an excellent demonstration and explanations of how to mow with a scythe.
back to top- How do I set the handles on an American style scythe?
 The handles can be adjusted up or down the snath to suit your height. This is pretty much a trial and error process. With the blade mounted on the snath stand the scythe up beside you with the back of the blade resting on ground. The lower handle of the snath should come to about your hip joint (where the ball of the femur sets into the pelvis). The upper handle will lie between your chin & shoulder. See image at right.
Most American snaths are only 58 inches long making it difficult to space the handles and place them high enough that people over 5’-6” can mow close to the ground without bending over. A stooped position puts considerable strain on the mower’s spine with resulting back pain.
It is very easy to write “adjust the handles” but on an old snath getting them to move will likely be difficult. The handles are held onto the snath by a loop bolt that runs through the handle threading into a nut embedded at the end of the handle. The trick here is to know that the thread runs left handed instead of the usual right handed. This means you turn handle clockwise, viewed from the nut end, to loosen it; the opposite to tighten. To turn a handle that has set in one position for many years may require the application of WD-40, Liquid Wrench or some similar ‘nut buster’. A little brute strength helps, too. Some handles are so tight as to require you to grip the handle with a pair of pliers, ‘Channel-Locks’ or a pipe wrench for extra leverage. Be sure to place some sort of padding between the jaws and the handle to prevent damage to the wood. Patience and gentleness is required when using a wrench to lever the handle loose.
back to top- Will your blades fit on an American style snath?
We have found that sometimes it is possible to retrofit. It depends on the snath and the mounting clamp you describe. The nib on the tang of our blades is often too large for the holes in the American style clamp. You can file the nib down to fit. We have found that often our tang is too wide and/or too thick to fit the collar on an American snath. Again you can grind or file metal off one piece or the other to get a fit. Use care with a grinding wheel as it is possible to overheat the metal in the tang and destroy the temper.
The adjustable clamp (3 square holes) will allow you to adjust the hafting angle on the blade. Try different positions to find what is most comfortable for you. The best position may vary under different mowing conditions.
You may need a wedge of some sort fit under the tang between it and the snath so the bottom blade can be adjusted to sit somewhat parallel to the ground. With you holding the scythe in a mowing position the cutting edge should be off the ground by about and eighth to a quarter of an inch when the bottom of the blade lays on the ground.
One of the problems with a retrofit that works is that with so light a blade on a very heavy snath the assembled scythe feels very out of balance. If your snath is one of the old ones that were made thin and light the imbalance will be less.
The preceding information applies to grass and ditch blades. Our bush blades will not fit on an American style snath. The tang of a bush blade is too thick, too wide and the angle of the tang is so steep that when the blade is mounted on a curved snath the edge points into the ground. What you end up with is a hoe.
- Can I peen my American pattern blade?
You can peen a blade on an American scythe but the process and results are
frustrating. The American blade is heat treated so that the steel is hard
and not particularly malleable. Hammering a hard American blade takes a good
deal of time and effort and the results are questionable. Peening
(hammering) draws an edge out very thin and the American blade is not
designed for peening. These blades are meant to be sharpened using a slow
turning, sandstone wheel then honed occasionally with a stone.
The European style blades are crafted to be malleable and ductile. A narrow
band along the edge can drawn out thin with a hammer. Once that is done you
bevel the cutting edge with a light stone and use the same stone to sharpen
and hone the blade as you mow.
back to top
- How do I sharpen the blade on my American Style Scythe
The best way, and the old standard, is to sharpen your American style blade on a slow turning grind stone, one turned by hand or with a treadle. You've probably seen the kind I'm referring to. They are about 20" in diameter, 2" or so across the face and mounted on a wooden trestle.
Sharpen only on the top side. Once the top side is beveled you can run a hand stone across the bottom in the direction from the edge to the rib to remove the wire edge. While mowing stop every once in a while (you'll feel the edge lose its keenness) and use the stone to quickly touch up the edge.
In the absence of a grinding wheel described above you can use a file to bevel the edge on the top side of the blade. An 8 or 10 inch Mill Smooth flat file does an excellent job. Be sure to follow up with a whetstone to hone the edge and use the stone as needed when mowing.
One sharpening tool to avoid is a high speed grinding wheel that is found in many farm shops. These wheels turn so fast that the blade is quickly overheated destroying the temper in the steel making the blade useless as it no longer holds an edge.
back to top- Can the scythe be used on a slope?
Yes, a scythe will work very well on a slope. It is best to start at the
bottom and work across the slope (perpendicular to the slope) with the point
of the blade facing downhill. When you finish mowing a swath walk back to
the original start point and mow the next swath parallel to the previous
one. Continue this way up the hill.
There is a safety consideration in mowing a slope as the steeper the slope
the more difficult it is to keep your balance. As with any sharp tool
maintaining balance is paramount to prevent cutting yourself or falling on
the scythe.
- My scythe bogs down in heavy grass. What can I do?
That may be because you are taking too much of a bite with the blade. Try starting the stroke with only a third or less of the blade engaged in the grass. By the time you are at mid-stroke the full blade will be cutting and should not clog with grass; you will be able to cut through cleanly. Use an easy swing, not forceful. The scythe works better that way. Too much force causes the blade to bog down as it tries to cut to much in one bite.
Another possibility is the grass is old and dry. In that condition it is very difficult to cut and requires you take very small bites with the blade. This is true for any grass and dry grass will dull a blade quickly. You will have to hone frequently.
- Why does most of what I try to cut just bend over and pass under the blade.
I would say there are two possible problems with solutions.
The blade may not lay correctly on the ground. The cutting edge near the beard should be about 1/16” – 1/8" off the ground when the belly of the blade is on the ground. If you take the blade off the snath and lay the blade on a flat surface the blade will lie correctly. Use this as the criterion for adjusting the snath to the blade so the edge lies correctly. If the edge is too high off the ground then the blade rides over the grass instead of cutting it. If the edge is too close to the ground then it frequently digs into the dirt.
Before making adjustments to the snath check your mowing stance. Your body should be relaxed, your feet about 24" apart (perhaps more for your height). Hold the snath by the handles and leave the blade on the ground, extend your arms at your sides cupping the upper handle in the curled fingers of your left hand. The tips of the fingers of your right hand will touch the lower handle.
Another check to try is shown in our workshop 5
http://scythesupply.com/snathfitworkshop.html
If you have to make adjustments to the snath so the blade lays correctly take a look at Chapter X in "The Scythe Book". Pages 174 &175 show and explain how the blade should lay and how to make adjustments to the snath.
Another possibility is your technique may be off. Please check our workshop 3 http://scythesupply.com/strokeworkshop.html. Also, the mowing section in Our VHS video “Maintaining and Using the European Scythe” http://scythesupply.com/equipment.html has an excellent demonstration on how to swing the blade in an arc so the blade slices the grass. Cutting grass or brush is a lot like slicing a tomato where you draw the knife through the tomato instead of pushing straight down. The scythe is used the same way so that the full length of the blade cuts not just one place.
If you are drawing the scythe straight across your body then the blade cuts like an axe. The grass will only bend over and little will be cut.
- Aren't all scythes the same?
There are two general types, the American and the European The common perception of a scythe is the familiar American pattern that is found in practically every antique store and barn. This is the instrument of torture that sent our ancestors to an early grave and has given the scythe its terrible reputation in this country. But, there is another style of scythe, developed and refined in Europe more than 500 years ago and still used and respected there. This scythe has a thin hammered blade that is curved and tensioned, making it light weight, strong and stiff. It takes time and skill to make a blade like this, which is why American industry changed the pattern to favor efficient manufacture rather than efficient use. So, when we talk about the scythe we are referring to the European style.
back to top- What about having to keep the scythe sharp?
This is explained in detail Workshop #1 & 2
The following will sound complex and time consuming but in the end it is no more bother than sharpening a lawn mower blade.
The cutting edge of the European scythe is hammered (Dengled) in preparation for honing. It is not ground on a grindstone or wheel. The cutting edge (a zone of about 1/8 to 1/16 inch) is dressed with a cross peen hammer on a small domed anvil. This draws the metal out thin and work hardens it. Nowadays there is a peening jig contraption available that allows practically anyone to accomplish this. After hammering, the blade is sharpened and maintained with a whetstone. The whetstone can quickly renew the edge in the field (We can do a 28" blade in about 15 seconds). Honing can be done as often as every 5 minutes, it becomes second nature and provides a moment to pause and relax. When the edge has been worn back by the stone through repeated honing, the blade must be re-hammered. For the casual user (depending on use) this may be an interval of weeks.
back to top
back to home