Workshop 1: Peening
Blade Length
Scythe blades range in length from short (16") bush blades to sizes beyond 30". The shorter bush blades are heavier to take the stress of cutting woody growth. Shorter blades are more maneuverable in tight places.Grass blades are lighter in weight and can be longer. Longer blades are more efficient in the open. A 24" or 26" blade is a good compromise. As you become more proficient the larger size blades become more comfortable to use. Click here to see more on blade types and selection.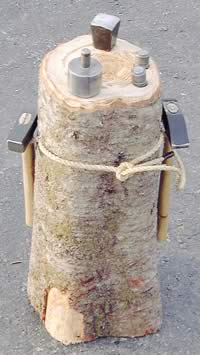
Sharpening
The traditional method of preparing the edge uses a cross peen hammer and a small anvil. A hammering jig also gives good results and avoids the freehand uncertainties of the anvil. The peening process takes advantage of the plastic nature of metal. Hammering the cutting zone (about 1/8" inch wide) draws the metal out, thinning it for easier sharpening.This beating also work hardens the metal and enhances edge retention. A whetstone is used to finish the sharpening but in doing so abrades the edge and wears it back so eventually you will have to re-peen to restore thinness.
Mounting the anvil or jig
Either of these two tools can be held in a bench vise. This will work, but the vise may not be at a convenient height or in good light. A better idea is to mount them into a section of log. You'll want a log tall enough to bring the blade to approximately lap level when you're seated. A log that's 22” high works well. Soft wood will be easier to drill and there is more shock absorption to it when peening. Try to make both ends of the log as flat and square as possible. Use a log about 6” to 8” in diameter. If a log is not available you can use a section of 6x6 or 8x8 lumber from your local lumber dealer. An alternative is to spike or screw together sections sawn from an eight-foot long 2x6 or 2x8 plank.
In one end of the peening log drill a 3/8” hole about 1.5 inches deep at a convenient location for the spike on the bottom of the peening jig. The hole diameter for an anvil is ½”. Be sure to locate holes far enough away from edges to prevent splitting. The hole won’t look wide enough for the spike but it will expand as the spike is driven into the wood. This is especially true for softwood. Hardwood can be a bit more difficult with a tendency to split. Go slowly.
We have installed both the anvil and the jig into the same log for convenience. The two caps that are part of the jig setup are kept handy in 7/8” or 15/16” holes drilled to the side. We got a little fancy by attaching a piece of rope around the log, using fence staples to provide loops to hold my hammers. The rope also forms a top handle that allows the whole thing to be lifted and carried.
For further information see our article at Making a Peening Log - Scythe Supply
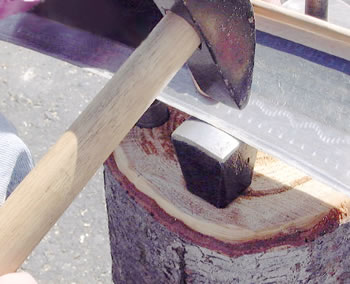
Peening lies somewhere between the art of jewelry making and blacksmithing. You are using the hammer to redistribute the metal ever so slightly. Think of the steel as a very dense modeling clay that can be coaxed into shape by moderate repetitive force. Heavy hammer blows are unnecessary. A firm yet sensitive strike that makes a good solid sound is your goal.
Hammer & anvil—the cutting zone is drawn over the crown of the anvil gradually as the hammer strikes the metal. Coordinate the blade movement with the frequency of hammer blows. Try to keep the edge flat on the anvil crown. Peening of a new blade will take many passes. Don't try to do it all in one pass of the blade's length. Set an easy sustainable rhythm and work the blade from the beard to the tip. Examine the results, and start over again. With good light you should be able to see the results of each hammer blow during the process. The metal will seem to expand forward and become thinner. Remember you should be more like a jeweler than a blacksmith with the force of your hammer. As your edge approaches final thinness lighten the force of the hammer.Continue peening the blade's length as evenly as possible. When do you stop? Press your thumbnail on the underside of the cutting edge and slide it along (carefully), you should notice a barely perceptible wave as the edge deforms. At this point the edge is about the thickness of paper. If the blade has begun to crack or fissure you have over peened, but very light corrective taps can mend slight problems. Remember that most of a blades final sharpness is the result of good hammering, the whetstone only finishes an already sharp edge.
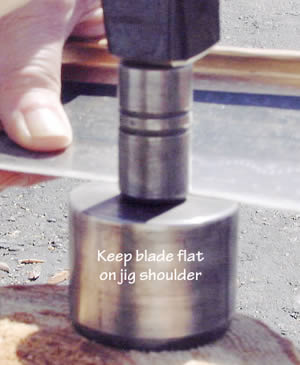
Jig —the same sensitivity and guidelines that apply to the hammer and anvil are used with the jig. The jig comes with two caps. The cap marked with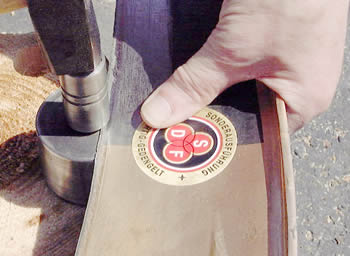 one ring is used first to establish a primary bevel. The cap marked with two rings finishes the process. Place a cap over the jig's post, slip the blade under the cap in very light contact with the post. Keep the blade flat on the jigs shoulder. Gradually draw the blade under the cap as you strike with the hammer. Work from beard to tip using a flat hammer—a common carpenters hammer of between 16-20oz. if fine. Allow the cap to rotate from the motion of the blade to allow for more even wear of the contact surface. Use cap #1 to establish a primary bevel, then use cap #2 for the finishing passes. Expect to make multiple passes to bring the blade to useable condition. Keep your hands close to the center line of the jig for better control. You may even be able to touch the jig with your fingers underneath the blade. When your grip on the blade has moved out of the comfort zone, stop to relocate your position.
 Sharpen for your intended use. A long thin cutting edge that is good for fine tender grass will be too weak and fragile if used on tough, woody stems. For heavier work keep the area that is hammered narrow, to support the cutting edge and make it stronger. Experience will guide you to the best compromise, giving you a sharp effective edge that will hold up to occasional abuse.
For more on peening and sharpening take a look at our video: Peening and Sharpening European Scythe Blades
If your blade is damaged and in need or repair, click here.