DIY Grain Cradle

Here are directions for making your own grain cradle out of easily available materials (also available as PDF). It is simple and straight forward to build. The one described here requires a bit of basic blacksmithing to make the eyes that join the pieces together. The joints can be welded or brazed instead. This cradle is sturdy and designed to be removed from the scythe when no longer needed to be stored away for next year’s harvest. The three holes drilled into the snath will not weaken it substantially so the scythe can be used for other purposes besides grain harvesting.
It took about an hour to put together the frame. Another hour to fit the screen and sew it in place with light steel wire. The cradle will gather grain without the screen but the screen improves the gathering plus it adds support by tying all the frame pieces together.
Materials:
3/16” diameter steel rod about 8 feet long
Window screening or the like.
26 or 28 gauge wire (wreathing wire).
5 minute epoxy glue
Tools:
Hammer
Small anvil (back of a splitting maul will do)
Hacksaw
Propane torch (or some source of strong heat)
Electric hand drill and small bit the size of the rod
A pair of needle nose pliers
A vice is helpful to hold the rod for cutting and bending
The photos give a better description of how the cradle is constructed than any detailed text. Study them and you will be well on your way. The dimensions listed are not hard and fast. There is a great deal of room for variation. There is nothing new here. These cradles have been made for centuries using what ever was at hand. Often they were simply a U shaped loop of supple wood bent from snath to blade and tied on.
The largest portion of the rod (about 56”) goes into the loop from snath to blade. There is a slight arc to the loop, as seen from the top, so that one end of the loop reaches up the blade about 8 inches from the heel. The other end of the loop is about 18"” back from the blade end of the snath.
On one end of the 56” length heat, draw out and shape a small, pointed hook about ½” long as shown in photo (2). Bend the hook at a right angle to the rod. The hook will fit under the strongback of the blade and into the crotch where the web meets the strongback.
When you eventually set the loop in place you may find that a dollop of epoxy glued to the blade will help hold the hook. Set the hook into the epoxy while the glue is still wet. To keep the epoxy from bonding to the hook rub the hook well with paraffin wax.
Be Aware: Our first attempt at fitting the hook was to drill a hole in the blade. The result was a ruined drill bit. The blade steel is so hard the drill only scratched the paint and did nothing to the blade.
Drill two 3/16” diameter holes in the snath from top to bottom. They are 10” and 18” back from the end of the snath. One end of the main loop goes into the furthest hole. The end of the lower brace goes into the hole closest to the snath end.
Bend and shape the main loop as shown in the photo (1). You should be able to do this without heat. Set the end of the loop into snath and the hook onto the blade. Spread the loop so there is spring in the legs to hold the hook in place. It will all be a bit wobbly but this will disappear as you add the braces.
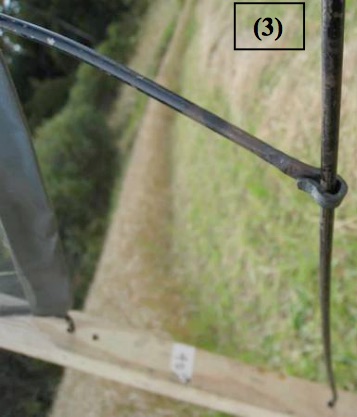
The ‘L’ shaped bottom cross brace runs from the first hole in the snath to the front (toward the blade) leg of the main loop 2” or 3” above the hook. Measure the distance and add an inch for the eye that holds this brace to the leg of the loop. Don’t forget to figure in the thickness of the snath. Add some extra length for an arc to match the one at the top of the main loop. Shape an eye (photo (3)) in one end of the brace. Bend the other end at a right angle to set into the snath.
To shape an eye heat about an inch of the rod red hot at one end. Hammer this flat to about 1/16” thick. Bend this into an ‘L’ shape. Reheat the flat then with either a hammer or twisting with a pair of needle nose pliers shape it into a circle back to meet the longer part of the rod. The inside diameter of the circle should be about 3/16 to ¼ inch. If there is excess material left on the loop cut it off with the hacksaw. Leave enough of an opening between the end of the eye and the rod so the eye will slip over the leg in the loop. Reheat, if necessary, and close up the eye with pliers.
There is a second cross brace about halfway up the loop. Measure the distance and cut a piece of rod adding ¾” for an eye at each end. Again, allow enough length to match the arc across the top of the main loop.
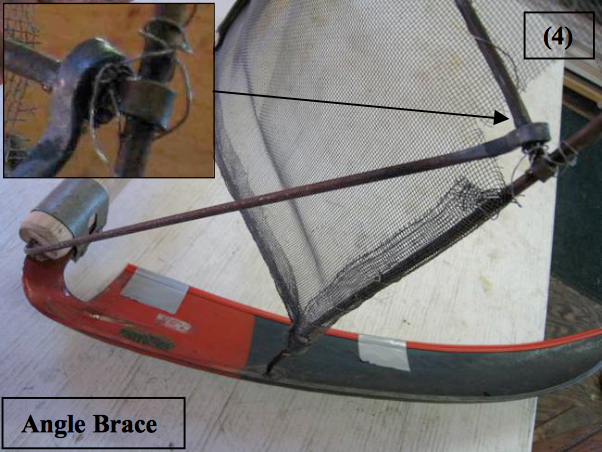
There is a need for an angled brace running from the second cross brace to the snath as shown in photo (4). Drill a 3/16” hole about 1-1/4” deep into the end of the snath. Measure the distance from the cross brace to the snath. Add 2” for a short (1” or so) leg on one end and an eye on the other. Be careful not to make this brace so long that it pushes the hook in the main loop away from the blade.
Once satisfied that the cradle is solid and has the shape that you want you can cut, fit and lace the screen to the perimeter of the frame. The screen should be large enough that the edges can be lapped around the cradle frame as seen in photo (4). The screen shown in the photos does not reach fully between both legs of the loop. The cradle will be more effective if the frame is completely screened. Use duct tape to cover any raw edges.


Enjoy the harvest!
To see more videos click here.
